 GitBucket
Add documentation to a Custom C# node
You can also add Graph Inspector documentation to a Custom C# node. Visual Scripting displays the documentation in the Graph Inspector when you select a node in a Script Graph. The documentation isn't required to use the node, but can help your users understand the purpose and usage of a node.
To add documentation to a node:
-
[!include[open-project-window](./snippets/vs-open-project-window.md)]
[!NOTE] If you already have an Editor folder in your project, you can skip Steps 2-3.
-
Right-click your Assets folder or select Add (+), then select Folder.
-
Name the folder Editor.
-
Do one of the following:
- Right-click your Editor folder in the Project window's folder list.
- Right-click anywhere in the Project window's preview pane with your Editor folder selected.
-
[!include[create-c-script](./snippets/vs-create-c-script-project.md)]
-
Enter a name, such as
MyNodeDescriptorfor the new script file. -
Press Enter.
-
[!include[open-new-external-code](./snippets/vs-open-new-external-code.md)]
-
In your external editor, copy and paste the following code into the C# script:
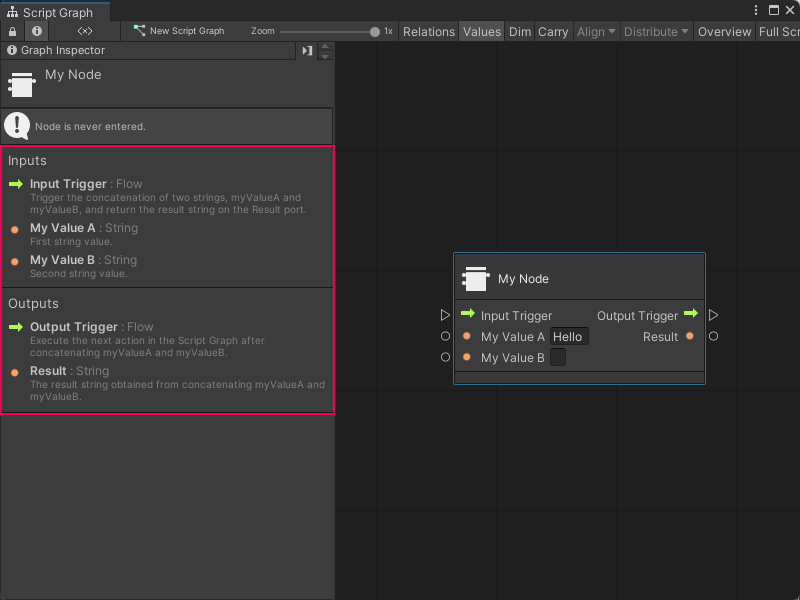
 using System;
 using Unity.VisualScripting;
 using UnityEngine;

 [Descriptor(typeof(MyNode))]
 public class MyNodeDescriptor : UnitDescriptor<MyNode>
 {
 public MyNodeDescriptor(MyNode unit) : base(unit) {}

 protected override void DefinedPort(IUnitPort port, UnitPortDescription description)
 {
     base.DefinedPort(port, description);
     switch (port.key)
     {
         case "inputTrigger":
             description.summary = "Trigger the concatenation of two strings, myValueA and myValueB, and return the result string on the Result port.";
             break;
         case "myValueA":
             description.summary = "First string value.";
             break;
         case "myValueB":
             description.summary = "Second string value.";
             break;
         case "outputTrigger":
             description.summary = "Execute the next action in the Script Graph after concatenating myValueA and myValueB.";
             break;
         case "result":
             description.summary = "The result string obtained from concatenating myValueA and myValueB.";
             break;
     }
 }
 }
You can modify the script to suit the specifics of your own node.
-
[!include[save-script](./snippets/vs-save-script.md)]
-
[!include[return-unity](./snippets/vs-return-unity.md)]
-
Do one of the following:
- [!include[open-graph-w-node](./snippets/custom-c-nodes/vs-open-graph-w-node.md)].
- [!include[ff-add-node](./snippets/custom-c-nodes/vs-ff-add-node.md)]
-
Select the node and open the Graph Inspector to view your documentation.
Next steps
After you add documentation to a node, you can choose to further customize the node with node class and port attributes.